
If you want to set up Mailwizz for your personal email deployments or to run a business, this is for you. It’s challenging to find a simple guide that helps you set up Mailwizz on a server. This post is a very brief overview of Mailwizz along with a step by step guide on how you can get it set up on a server within the next hour.
What is MailWizz?
MailWizz is a self-hosted email marketing application that businesses can use to send their email campaigns and autoresponders. Mailwizz has been around since 2013, and thousands of companies use it as their main method of storing lists and sending email via SMTP’s.
MailWizz comes packed with features and offers great value; it’s a self-hosted software that only has a one-time fee unlike traditional subscription-based models. Once you have it set up, you can start sending emails to different lists with campaigns or autoresponders and have all of the same luxuries as other subscription based mass mail platforms.
What I like the most about Mailwizz is the Admin side of the software. You can create client accounts and give them permissions and controls in the same way any mass email platform would for their clients. So you can use Mailwizz for your own personal needs, or you can set up accounts for other companies, partners or run it as a separate business.
You can purchase Mailwizz here: Code Canyon
Features of MailWizz
Admin User Management
You can add unlimited client accounts and manage their access and permissions separately. This Admin feature allows you to create rules and options for each client account. You can set up client accounts for personal use, for your personal partners that you manage data for, or if you want to create a separate account for a business partner you can.
Mailwizz Admin Dashboard View
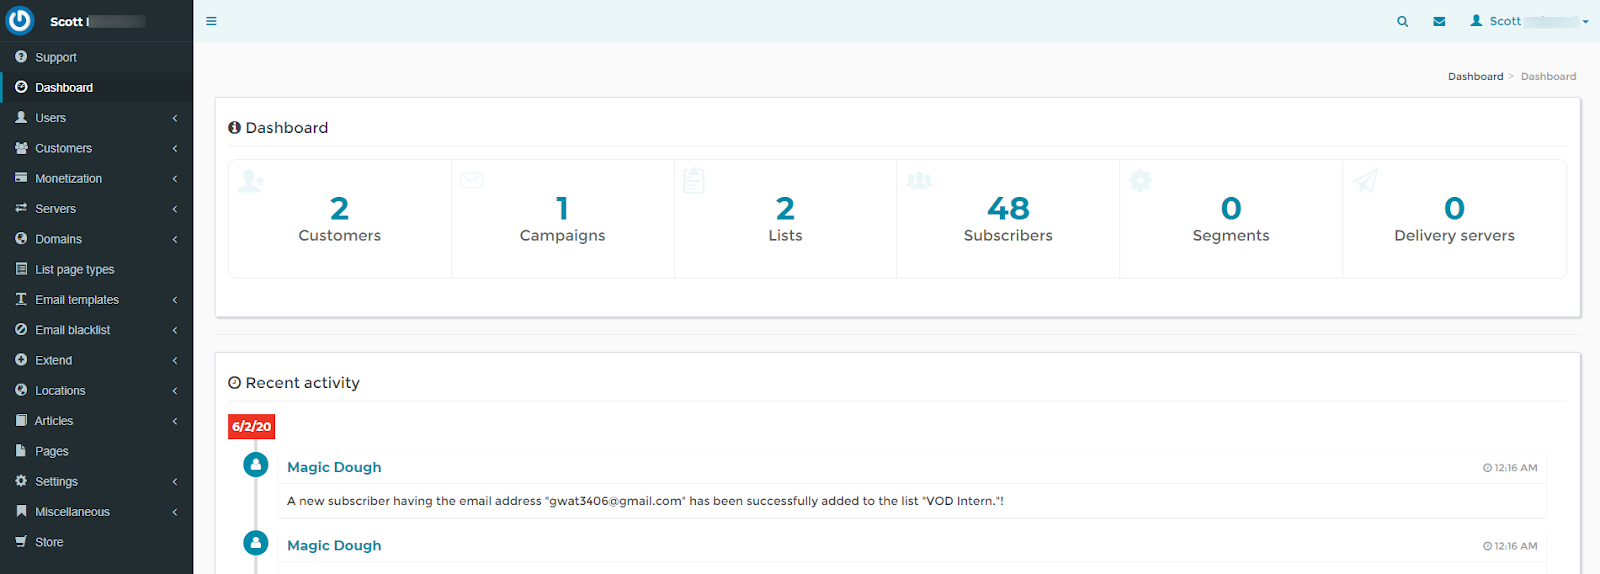
Admin Dashboard Overview – You can quickly scan how many overall accounts you have set up (customers/clients), campaigns, lists, overall leads or subscribers, segments and delivery servers system wide. This view is all encompassing for all client email accounts (Mailwizz term is “Customers”).
Admin Left Menu Overview:
Users – Other Admin users
Customers – Individual accounts
Monetization – Charging for Accounts
Servers – Delivery SMTP’s, bounce, feedback loops
Domains – Sending & tracking domains
List Page Types – System emails to users
Email Templates – Saved email templates
Email Blacklist – Global suppression file
Extend – Optional 3rd party plugins
Locations – IP locations, Maxmind Countries
Articles – Content area to publish
Pages – System terms & privacy policy
Settings – All main system settings
Misc – System logs and reports
Store – Optional system upgrade buys
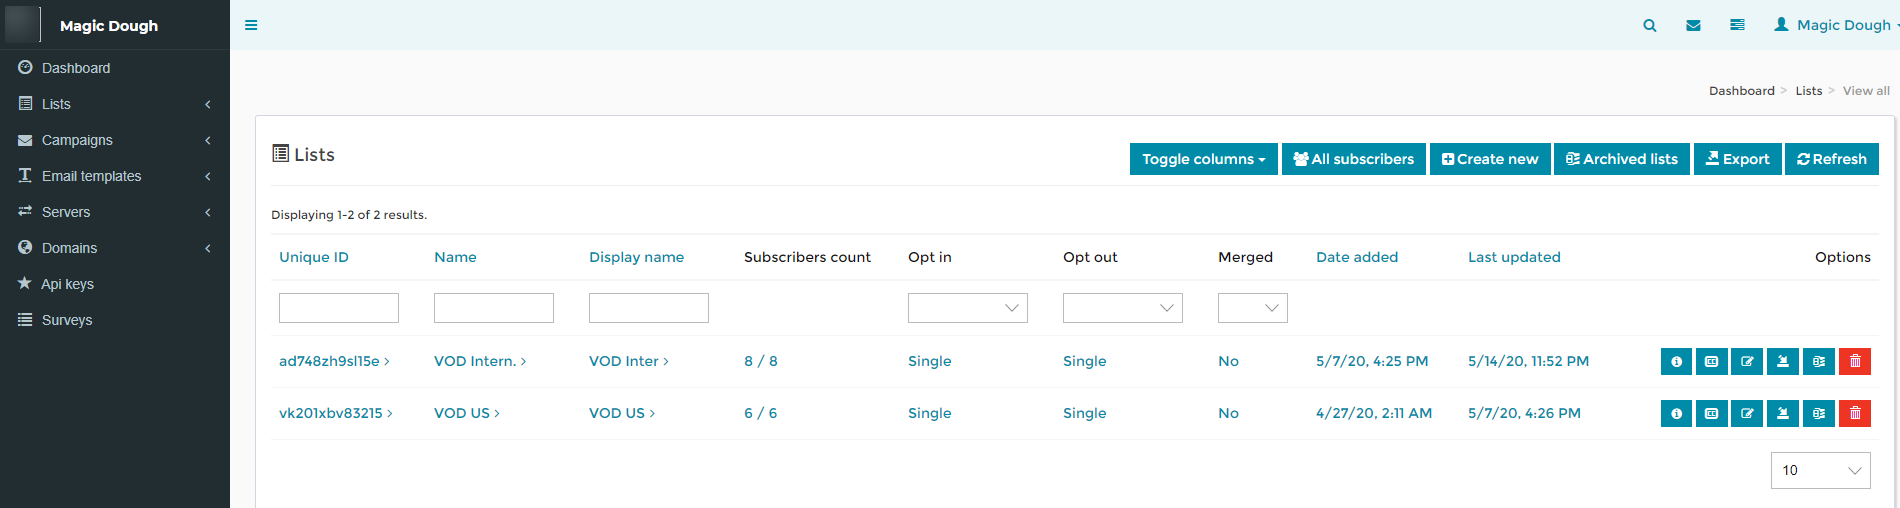
Simple “Client” / User Dashboard
MailWizz comes with an easy-to-use client dashboard that gives users transparency on your email lists, autoresponders, subscribers, list segments, delivery servers and more. The client dashboard is very straightforward and easy to use.
“Client” / User Left Menu Overview:
Dashboard – Overview of campaigns, lists, subscribers
Lists – Individual list details and editing options
Campaigns – Campaigns, autoresponders & more
Email Templates – Saved templates
Servers – Delivery servers, bounce servers & feedback loop
Domains – Sending domains
API Keys – System generated API keys
Surveys – Set up surveys
* This menu can be added to or changed based on the Admin
Quick Support
MailWizz admin or community members provide quick support and responses so that you can get help when you need it. They have a massive support section that you can use for guidance and getting your questions answered.
See the support section – https://www.mailwizz.com/support/
How To Install Mailwizz – Setup Steps
Please note that setting up Mailwizz requires technical expertise. If you’re unfamiliar with setting up new servers, this is something you should outsource. There are many 3rd party tech agencies that will set all of this up for a small fee.
If you would like to use an approved Listflex provider, please email customers@listflex.com and we will help you make the arrangements.
If you’re installing this yourself, here are the steps. Most of this information is directly off of Mailwizz.com web pages. You can access any of it there as well. This post is our way of making it easier for you.
You can purchase Mailwizz here: Code Canyon
Here’s the Mailwizz install set up video
https://youtu.be/tT5wU7ij3io
Choose A VPS
- We recommend you use a brand new fresh VPS for Mailwizz
- Any recent distro of Linux will work
- Consider 4 vCore, 2.4 Ghz, 8GB Ram
- A good place to get it is https://www.digitalocean.com/
- Make note of your SSH access root to this VPS
- Make note of your Mailwizz license key from Envato
- Point your domain to the VPS IP address & add proper DNS
- SSL Certificates are recommended
Getting Started – Step By Step
Step 1 – Unzip the archive containing the MailWizz application.
Step 2 – In the resulted folder, you’ll find a folder named “latest”. Upload the contents of that folder to your web hosting account, in the web document root (likely something like /home/username/public_html or /var/www/html).
Please note that if you already have another web app installed in your document root(i.e: wordpress), it is better to create a new folder inside the document root, say mailer ( /home/username/public_html/mailer/) and upload the files there.
Step 3 – Point your browser to the install directory, i.e: http://www.domain.com/install/index.php
Step 4 – After installing, make sure you remove the install folder from your host ( the folder that is called install ).
Visit http://www.mydomain.com/backend to get started
You’ll next want to Understand the application structure.
Then follow these steps:
As an admin:
- Make sure your cron jobs are properly set.
- Add your delivery servers.
- Add your bounce servers.
- Add your feedback loop servers.
- Verify your delivery settings.
- Check out ways to extend the application.
- Learn what available logs you have at hand for troubleshooting potential issues.
As a customer:
Resources:
Purchase Mailwizz here: Code Canyon
Buy A VPS Here: https://www.digitalocean.com/
Mailwizz Install Video: https://youtu.be/tT5wU7ij3io
Mailwizz support section – https://www.mailwizz.com/support/
Additional Mailwizz Support – https://kb.mailwizz.com/articles/install-steps/
If you have any questions regarding this article, don’t hesitate to reach out to our team. We’re happy to help you connect your Listflex leads up and into Mailwizz.
All The Best,
Scott Heistand